Someone has gone to the trouble of taste testing all the powdered milk out there. My favorite is Morning Moo. Look at this before you buy.
This post is cross posted from
my blog.
Ever wanted to find a powdered milk that tastes good? You’re not alone. So just in case you don’t want to go through the expense and hassle of trying out every kind of powdered milk you can find, read on. I did it for you.
After a comment about the flavor of powdered milk on another post, I hatched a plan to have folks try a bunch of different kinds of powdered milks to maybe find one that tasted good so this reader and anyone else who wants to know (including me) will know which brands would be best to buy because you know powdered milk is not cheap. I had some super help with this milk experiment from
Emergency Essentials,
Grandma’s Country Foods,
Walton Feed,
Blue Chip Group (now Augason Farms), and
Honeyville Grain who all donated some of their milk for the review. Thank you to all of you–we couldn’t have done it without you!
So here’s the basic setup. I gave each milk a letter A through J. Yes, we tried 10 kinds of milk. 2 powdered milk alternatives, 2 regular non-instant powdered milks, 5 instant powdered milks, and regular old skim milk in a jug thrown in just for fun and science (but nobody knew which one it was). There were also two kinds of chocolate milks which I labeled R and S. A friend and I mixed up each kind of powdered milk and let it chill. Then we had people taste them and grade each on a scale of 1-5 with 1 being really bad and 5 being really good and let them write any comments they wanted to about any of them. This happened over two days. Then I totaled up the scores, divided by the number of tasters, and did some other fancy math statistics tricks I learned from my third grader and came up with the results. We’ll start with Milk F–the real milk, then we’ll go in order from A to J which were all the regular milks. I’ll give the review results on the chocolate milks in another post.
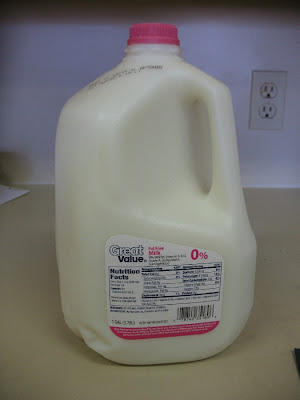
Milk “F” was Great Value brand fat free milk from Wal-Mart. This is the standard. If we want something to taste “like milk” this is what it should taste like. No, I don’t think fat free/skim milk tastes like milk any more than you do, but because all of the powdered milks are non-fat, we are using non-fat milk to compare them to. It’s average taste score was 3.46, with scores ranging from 2-5 and the score chosen most often split equally between 3 and 4. Okay, for all you parents of grade schoolers, that is “mean=3.46, range=2-5, mode=3, 4″. Got it? Ingredients: milk, vitamins A and D.
Milk “A”: Honeyville Milk Alternative. Available from and donated by
Honeyville Grain. $11.99/can
Honeyville’s milk alternative is
not 100% milk. It has a whole slew of ingredients including sweet dairy whey, partially hydrogenated vegetable oil, corn syrup solids, and vitamins A and D3. The instructions say to mix it into warm water. We used the same mixing pitcher to mix each kind of milk, of course washing it in between. This one mixed up fairly easily. It took 2 cups of powder to make a gallon of drink. It was kind of thin, you might put more than that in. This one didn’t score too well on the taste. It average score was 2.09 with a range of 1-4 and the most common choice being 1. This milk settled/separated over time after being mixed, so you’d want to keep it in a container that you could easily mix it before pouring.
Milk “B”: Morning Moos Milk Alternative. Available from and donated by
Blue Chip Group (now Augason Farms). Also available at some Utah Wal-Marts and Associated Foods Stores. $11.89/can.
Morning Moos is the second in our milk alternative group. This is not 100% milk. Its ingredients include sweet whey, creamer (including corn syrup solids), coconut oil, sugar, nonfat milk, vitamins A and D. The can claims great results when using it for cooking due to the high percentage of whey. I’m not sure I’d use a milk alternative to substitute for milk in a recipe. I think I’ll stick with real powdered milk. However, this milk alternative had the highest score among all the milks sampled for taste. So maybe some for drinking or putting on cereal would be good to have around. It mixed easily into warm water. It also took 2 cups of powder to make a gallon of drink. Morning Moos average taste score was 4 with a range of 2-5 and the most common choice was 4. I’m kind of partial to real milk, but if I was storing just for drinking and wanting it to taste good, I might get me some cans of Morning Moos.
Milk “C”: Western Family (Store Brand) Powdered Milk. This particular brand is available at Associated Foods stores. I’m guessing it is a comparable taste to other store brands. I really didn’t want to test all the store brands I could find, so this is it.


This is an instant powdered milk and mixed up the easiest of all. It dissolved readily in warm or cold water. It also didn’t taste very good. It was the classic powdered milk taste. Ick. It is 100% milk–ingredients: nonfat dry milk, vitamin A palmitate, vitamin D3. It took 5 1/3 cups to make a gallon. Wow. That’s a lot of powder to get a gallon of milk. Seriously, I had no idea there was as much variance as there is in the amount of powder required to mix a gallon of milk. The other drawback with this kind of powdered milk is that it is packaged in a box–not good for long term storage. Average taste score was 2.15, with scores ranging from 1-4 and the most common taste score was 2. My favorite comment on this one: “Bitter, tastes like old milk.” There you have it. So if store brand boxed powdered milk is what you usually buy, I have good news for you–There ARE better tasting powdered milks out there.
Milk “D”: Country Fresh Farms Instant Powdered Milk. Available in my Wal-Mart baking aisle for $9.99/can.


For starters, this stuff was a big pain to mix. We tried mixing it into warm water and it clumped pretty severely, so then we tried mixing it into cold water which made it worse. We ended up throwing the whole cold water pitcher out and starting again with warm water. Holy hassle, Batman. This stuff repelled water. We joked as we were fighting with it that it would probably be the best tasting just because it was such a pain to mix. It actually did turn out to have pretty good flavor. Its average taste score was 3.29 which was almost as good as real milk. It is 100% milk–ingredients: 100% real instant nonfat dry milk. It doesn’t appear to have vitamins added. It took 5 1/3 cups to make a gallon, so you don’t get very many gallons out of a can. Probably 2-3 gallons. So even though the cost of the can isn’t as high as some of the others in the experiment, your cost per gallon is pretty steep. Taste scores ranged from 2-5 on this and the most common score was 3.
Milk “E” Country Cream Instant Non-Fat Milk. Available from and donated by
Grandma’s Country Foods. Also available at Utah Macey’s stores and some Associated Foods stores. $12.99/can.


This milk mixed up easily in warm or cold water. We used warm for the experiment (after the trouble mixing milk D, we just mixed everything else into warm water), but I have mixed this into cold and not had a problem. This was a pretty good tasting powdered milk. I liked it, but one farm lady thought it tasted like calf milk. It’s average taste score was 2.77, but the most common score chosen was 4. The few that didn’t like it, really didn’t like it, so that brought the average down. Scores ranged from 1-4. It took 3 cups to make a gallon, so a better mix ratio than some of the others. Ingredients: 100% real instant nonfat milk, vitamins A & D. I’d buy this milk. Especially when it goes on sale at Macey’s (too bad there’s not a Macey’s near me–that is one place I miss since we left living in the civilized world). You might get a can and test it out before buying a case of it just in case you’re one that doesn’t like it.
Milk “F” was the regular milk in a jug we discussed at the top of the post, so on to milk “G”.
Milk “G”: Rainy Day Foods Instant Non-Fat Milk. Available from and donated by
Walton Feed. $13.00/can.
The ingredients on this one were nonfat dry milk, lactose, vitamin A palmitate and vitamin D3. The instructions say you can mix into cold water. We used warm again and it mixed easily. This milk had more “flavor” than some of the others. A common comment was “sweet”. For some uses, like baking, I don’t mind my powdered milk having “flavor”, but for straight drinking, I don’t like it so much. It took 5 1/3 cups of powder to make a gallon of milk, so this was on the high end of the mix ratio. Maybe if you mixed less in it wouldn’t have as much flavor. The average taste score on the Rainy Day instant milk was 2.81, with a range of 1-4 and the most common score chosen was 3.
There is one more instant powdered milk, but it got out of order in the lineup, so the next two milks are Non-Instant or Regular Powdered Milks.
Milk “H” Rainy Day Foods Non-Instant Dry Milk. Available from and donated by
Walton Feed. $10.80/can.
Non instant milks just don’t have great “milk” taste, and this one was no exception. They do, however, generally cost less per can and usually are more concentrated than instant milks so they use less powder to make the same amount of liquid milk. That all equates to more milk for your money. When you’re baking or
making canned milk substitutes or cheeses, it won’t matter how great your powdered milk tastes as a liquid–you’re not pouring it over your cereal. I’m all for stocking less expensive non-instant powdered milks for everything but drinking straight. We mixed this as the directions stated–mix the powdered milk into a small amount of warm water, then add the rest of the water either warm or cold. Maybe that’s what we needed to do on milk D. It worked great. Ingredients: Non-fat milk powder. The milk was not tasty with an average score of 2.0, scores ranging from 1-4 and a most common score of 1. One commenter simply said, “Bad!” Now before you go thinking how low those scores are, of the two non-instant milks we tried, this was the better one. It took only 2 cups of powder to make a gallon, so it’s really good on the mix ratio also.
Milk “I”: LDS Cannery Non-Instant Powdered Milk. Available through LDS church dry pack canneries. $7.05/can.


Okay, this is the least expensive powdered milk right now, and the one I have the most of and use regularly in baking and cooking. It was also solidly scored the worst tasting of all the milks we tried. No, I did not use the 12 year old stuff from my food room, I opened fresh stuff canned a month before the experiment. I had some folks about cry when they found out how bad it tasted because that was the only kind they had stored. But like I said before, I don’t care how it tastes as liquid milk when I’m making cheese or baking with it. I actually like the added flavor in my breads. So don’t despair, all that powdered milk you have from the cannery does not need to be replaced with something else. Maybe just supplemented with another brand to be used for drinking. The commenter who called that last milk “Bad!” called this one “Worse!”. Its average taste score was 1.75 with scores ranging from 1-4 and the most common score chosen was 1. It took 3 cups to make a gallon, so actually it makes the Rainy Day brand comparable in price for the amount of milk you can make from the can. Ingredients: nonfat dry milk, vitamin A palmitate, vitamin D3.
Milk “J”: Provident Pantry Instant Non-Fat Dry Milk. Available from and donated by
Emergency Essentials. $14.95/can
This milk arrived in the mail in time for the second day of testing, so some of the people didn’t get to try it, but quite a few still did. It scored best of all the instant powdered real milks with an average score of 3.5 (actually slightly higher than regular skim milk), scores ranging from 2-4 and its most common score was 4. It mixed easily in warm water and took 2 2/3 cups to make a gallon of milk. It has a low mix ratio, but is also the most expensive can of milk we tried, so wait for a sale here if you can. I’d definitely pick some of this up for drinking.
Wow, are you still reading? Amazing. We made it through all the regular white milks we tried. I’ll cover the chocolate varieties in the next post, so now for you visual people, here’s the information in a table.
Milk Alternatives:
Milk Name
|
Cost/can
|
Cups/Gallon
|
Average Taste Score
1=low, 5=high
|
Taste Score Range
|
Most often chosen taste score
(mode)
|
Honeyville
|
11.99
|
2
|
2.09
|
1-4
|
1
|
Morning Moos
|
11.89
|
2
|
4
|
2-5
|
4
|
Instant Powdered Milks (and real milk):
Milk Name
|
Cost/Can
|
Cups/Gallon
|
Average Taste Score
|
Taste Score Range
|
Most often chosen taste score
(mode)
|
Western Family Store Brand
|
Varies (boxed)
|
5 1/3
|
2.15
|
1-4
|
2
|
Country Fresh Farms
|
9.99
|
5 1/3
|
3.29
|
2-5
|
3
|
Country Cream
|
12.99
|
3
|
2.77
|
1-4
|
4
|
Great Value Real skim milk
|
Varies
|
n/a
|
3.46
|
2-5
|
3, 4
|
Rainy
Day Instant
|
13.00
|
5 1/3
|
2.81
|
1-4
|
3
|
Provident Pantry
|
14.95
|
2 2/3
|
3.5
|
2-4
|
4
|
Non-Instant Powdered Milks:
Milk Name
|
Cost/Can
|
Cups/Gallon
|
Average Taste Score
|
Taste Score Range
|
Most often chosen taste score
(mode)
|
Rainy Day Non-Instant
|
10.80
|
2
|
2.0
|
1-4
|
1
|
LDS Cannery Non-Instant
|
7.05
|
3
|
1.75
|
1-4
|
1
|

 This is a great method for off-the-grid low-tech clothes washing or, in my case, diaper washing as part of the Second Annual Flats and Handwashing Challenge.
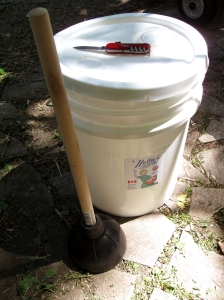
 The first thing you need to do is obtain a suitable bucket. The place where I work often has empty 18.9L (5 US gallon) detergent buckets, so I popped over to pick one up. Total cost to me? $0
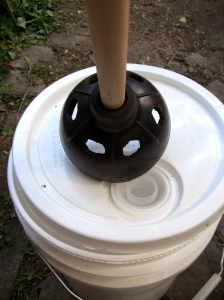
 The plunger, and the plunging action employed through good old elbow grease, act as the agitator in your washing machine. Depending on the style of your plunger, you may want to cut away the extra rubber flap inside — this can contribute to overly sudsy wash water, which is something best avoided when washing cloth diapers as it requires much more rinsing.
 The next step is putting it through a trial run.
 Overall, it went together quickly and was very easy to use. I stood the bucket on a knee-high step to facilitate the plunging, but I think I will get a longer handle for the plunger so I can set the bucket flat on the ground. I’m not sure I’d want to wash two days’ of diapers in one go, but doing a single day’s worth was pretty easy and not a terrible way to unload the many little frustrations of my afternoon.


